WebSocket-STOMP 테스트하기
SpringBoot의 테스트도구인 JUnit에서 WebSocket - STOMP 프로토콜을 테스트해보자
더불어서, Connect시의 accessToken 검증을 거치는 별도로 제작된 interceptor 통과를 위한 설정도 함께 한다.
1. SocketClient 생성
socketJS가 활성화된 서버임을 가정하며, 다음과 같이 session 객체를 얻어온다
this.SOCKET_URL = "http://localhost:" + port + "/ws";
this.session = setSession();

...


private StompSession setUserSession() throws ExecutionException, InterruptedException {

    // Client 설정
    WebSocketClient transport = new SockJsClient(
            Collections.singletonList(new WebSocketTransport(new StandardWebSocketClient()))
    );
    WebSocketStompClient stompClient = new WebSocketStompClient(transport);
    stompClient.setMessageConverter(new MappingJackson2MessageConverter());

	// Header 설정
    WebSocketHttpHeaders webSocketHttpHeaders = new WebSocketHttpHeaders();
    StompHeaders stompHeaders = new StompHeaders();
    stompHeaders.add(HttpHeaders.AUTHORIZATION, getAccessToken());

	// 서버 연결
    return stompClient.connect(SOCKET_URL, webSocketHttpHeaders, stompHeaders,
            getTestStompFrameHandler()).get();
}
참고로, client.connect는 내부에서 아래 체인구조의 생김새를 띠고 있다.
// in org.springframework.web.socket.messaging, CLASS: WebSocketStompClient

	// connect 1
    public ListenableFuture<StompSession> connect(String url, StompSessionHandler handler, Object... uriVars) {
        return this.connect((String)url, (WebSocketHttpHeaders)null, (StompSessionHandler)handler, (Object[])uriVars);
    }

	// connect 2
    public ListenableFuture<StompSession> connect(String url, @Nullable WebSocketHttpHeaders handshakeHeaders, StompSessionHandler handler, Object... uriVariables) {

        return this.connect(url, handshakeHeaders, (StompHeaders)null, handler, uriVariables);
    }

	// connect 3
    public ListenableFuture<StompSession> connect(String url, @Nullable WebSocketHttpHeaders handshakeHeaders, @Nullable StompHeaders connectHeaders, StompSessionHandler handler, Object... uriVariables) {

        Assert.notNull(url, "'url' must not be null");
        URI uri = UriComponentsBuilder.fromUriString(url).buildAndExpand(uriVariables).encode().toUri();

        return this.connect(uri, handshakeHeaders, connectHeaders, handler);
    }

	// connect 4
    public ListenableFuture<StompSession> connect(URI url, @Nullable WebSocketHttpHeaders handshakeHeaders, @Nullable StompHeaders connectHeaders, StompSessionHandler sessionHandler) {

        Assert.notNull(url, "'url' must not be null");

        ConnectionHandlingStompSession session = this.createSession(connectHeaders, sessionHandler);
        WebSocketTcpConnectionHandlerAdapter adapter = new WebSocketTcpConnectionHandlerAdapter(session);
        this.getWebSocketClient().doHandshake(new LoggingWebSocketHandlerDecorator(adapter), handshakeHeaders, url).addCallback(adapter);

        return session.getSessionFuture();
    }

    protected StompHeaders processConnectHeaders(@Nullable StompHeaders connectHeaders) {

        connectHeaders = super.processConnectHeaders(connectHeaders);
        if (connectHeaders.isHeartbeatEnabled()) {
            Assert.state(this.getTaskScheduler() != null, "TaskScheduler must be set if heartbeats are enabled");
        }

        return connectHeaders;
    }
주석은 메소드의 실행 순서이며 가장 기본적인 첫 connect()를 살피면 아래와 같다.
첫번째 .connect() 정보
public ListenableFuture<StompSession> connect(String url, @Nullable WebSocketHttpHeaders handshakeHeaders, @Nullable StompHeaders connectHeaders, StompSessionHandler handler, Object... uriVariables) {
    Assert.notNull(url, "'url' must not be null");
    URI uri = UriComponentsBuilder.fromUriString(url).buildAndExpand(uriVariables).encode().toUri();
    return this.connect(uri, handshakeHeaders, connectHeaders, handler);
}
1. 반환값, ListenableFuture<StompSession>
해당 반환값은 비동기 결과를 의미한다. StompSession객체가 포함되며, 이 객체를 통해 연결의 성공 여부의 처리가 가능하다
2. 파라미터, StompSessionHandler
StompSessionHandler인터페이스의 구현체 핸들러로, STOMP 세션 생성 시 이벤트 처리를 하는 데에 이용된다.
추후 JUnit에서는 BlockingQueue와 연계시킴으로써 메시지의 송수신을 모방할 수 있게 된다.
3. 파라미터, uriVars
가변 인자로 전달되는 이들은 해당 URL 템플릿에서 필요한 값을 동적으로 채울 수 있게 해준다
이 첫 번째 connect는 체인 구조에 따라 차례로 1, 2, 3, 4, processConnectHeaders, 4 ... 순으로 동작하게 되어있다
세번째 .connect() 정보
// connect 3
public ListenableFuture<StompSession> connect(String url, @Nullable WebSocketHttpHeaders handshakeHeaders, @Nullable StompHeaders connectHeaders, StompSessionHandler handler, Object... uriVariables) {
    Assert.notNull(url, "'url' must not be null");
    URI uri = UriComponentsBuilder.fromUriString(url).buildAndExpand(uriVariables).encode().toUri();
    return this.connect(uri, handshakeHeaders, connectHeaders, handler);
}
실제 나의 코드에서 바로 부르고 있는 세번째 connect() 함수는 다음과 같은 일이 일어난다
1. 파라미터, WebSocketHttpHeaders handsahkeHeaders
WebSocket 핸드쉐이크 과정(HTTP를 WebSocket으로 업그레이드 하는 과정)에서 사용될 HTTP 헤더 지정 부분이다.
connect를 수립하기 전에, 클라이언트가 서버에 HTTP요청을 보낼 때 사용 되는 것이다.
2. 파라미터, StompHeaders connectHeaders
변수명에도 보이듯이 connect 시에 사용할 Header 변수다
3. 동작, URI 생성
첨부된 url과 부가정보를 포함하여 접근할 URI 객체를 만든다
그 후 전달된 네번째 함수에서는 다음과 같은 일이 일어난다
네번째 connect() 정보
// connect 4
public ListenableFuture<StompSession> connect(URI url, @Nullable WebSocketHttpHeaders handshakeHeaders, @Nullable StompHeaders connectHeaders, StompSessionHandler sessionHandler) {
    Assert.notNull(url, "'url' must not be null");
    ConnectionHandlingStompSession session = this.createSession(connectHeaders, sessionHandler);
    WebSocketTcpConnectionHandlerAdapter adapter = new WebSocketTcpConnectionHandlerAdapter(session);
    this.getWebSocketClient().doHandshake(new LoggingWebSocketHandlerDecorator(adapter), handshakeHeaders, url).addCallback(adapter);
    return session.getSessionFuture();
}
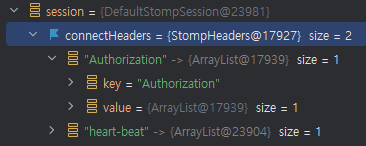
드디어 본격적으로 의도한 헤더를 포함하는 createSession이 생성되고있다
내부에서는 아래와 같이 동작된다


Autorization 헤더가 적용된 Connect용 StompSession이 만들어지게 된다.

다음 이 함수를 거치면 'adapter'가 생성되는데, 이는 WebSocket과 Stomp의 데이터를 공유하기 위한 Adpater이다
즉, WebSocket에서 데이터가 수신되면 STOMP 세션에 전달될 수 있고, STOMP 세션에서 데이터가 발생하면 WebSocket을 통해 전송할 수 있게 된다
this.getWebSocketClient().doHandshake(new LoggingWebSocketHandlerDecorator(adapter), handshakeHeaders, url).addCallback(adapter);이제 connect 함수의 마지막에 다다르면 doHandshake() 함수가 동작하는데, 아래처럼 두 가지로 구현되어있다

내 경우에는 SocketJsClient가 실행될 예정이므로, 실제로 추적해보면 해당 위치에 디버깅이 잡힌다

여기에 위치한 WebSocketHttpHeaders는 null값이다. 즉, StompHeaders와 혼돈하면 안 된다. 이 둘은 독립적이다.
대신, addCallback(adapter)가 동작하면서 아래처럼 connectionHandler가 callback 객체로 전달된다


그럼 이제 타고타고가서 NEW 시점을 한 번 만나면 callBack 함수로써 추가된다.
즉, 성공한 핸드쉐이크 이후 WebSocket 연결을 통해 STOMP메시지가 CONNECT 프레임에 포함된 Authorization을 전송할 수 있게 되는 것이다.
예를들어, 아래와 같이 ChannelInterceptor를 구현한 SocketInterceptor가 있다면 CONNECT로 분기되어 AccessToken을 확인할 수 있다
public class UsrConfigWebSocketInterceptor implements ChannelInterceptor {


    @Override
    public Message<?> preSend(Message<?> message, MessageChannel channel) {

        StompHeaderAccessor accessor = StompHeaderAccessor.wrap(message);
        if (accessor != null) {
            StompCommand command = accessor.getCommand();
            log.debug("STOMP Command: {}", command);
            if (StompCommand.CONNECT.equals(command)) {
                String bearerToken = accessor.getFirstNativeHeader(HttpHeaders.AUTHORIZATION);
                ...
            } else if (StompCommand.SUBSCRIBE.equals(command)) {
                handleSubscribe(accessor);
            } else if (StompCommand.SEND.equals(command)) {
                handleSend(accessor);
            }
        }

        return message;
    }
}
2. 메시지 송수신 모방을 위한 BlockingQueue 객체
최초의 stompClient.connect() 사용을 보면, getStompFrameHandler() 를 통해서 이벤트 수행함수를 전달하고 있다
stompClient.connect(SOCKET_URL, webSocketHttpHeaders, stompHeaders, getTestStompFrameHandler()).get();
멀리서 class 단위로 봤을 때 아래와 같이 동작하는 함수다
    private BlockingQueue<MsgVO> blockingQueue;

    @BeforeEach
    public void setup() throws ExecutionException, InterruptedException {
        this.SOCKET_URL = "http://localhost:" + port + "/ws";

        // Client 생성
        this.session = setSession();

        // 메시지 관리를 위한 Queue 생성
        this.blockingQueue = new LinkedBlockingQueue<>();
    }


    private StompSession setSession() throws ExecutionException, InterruptedException {

        ...

        return stompClient.connect(SOCKET_URL, webSocketHttpHeaders, stompHeaders,
                getTestStompFrameHandler()).get();
    }


    private StompSessionHandlerAdapter getTestStompFrameHandlerError() {
        return new StompSessionHandlerAdapter() {

            @Override
            @NonNull
            public Type getPayloadType(StompHeaders headers) {
                return MsgVO.class;
            }

            @Override
            public void handleFrame(StompHeaders headers, Object payload) {
                errorBlockingQueue.offer((MsgVO) payload);
            }
        };
    }
Override로 재정의한 메소드를 보면, 수신된 메시지에 대해서 처리할 자체 객체(MsgVO.class)를 정의해주고, 그 다음으로 실제 전달된 payload에 대하여 캐스팅시켜 Queue에 읽힐 수 있도록 저장한다
BlockingQueue를 쓰는 이유는, 앞서 보았듯이 connect() 등의 소켓 동작에서는 Future처럼 비동기 객체를 사용하고 있다
비동기적 메시지 처리에서는 동기화 문제를 해결해야하고, BlockingQueue는 이 비동기 행위를 동기적으로 제어할 수 있게된다
예를들어, 테스트 코드가 특정 메시지가 도착할 때까지 기다려야된다면 BlockingQueue.take() 메소드를 통해서 해당 메시지가 큐에 들어올 때까지 Bloking 시킬 수 있다.
만약 이 BlockingQueue를 쓰지 않았다면, 메시지 수신도 전에 테스트 결과 확인 코드가 먼저 실행되어 실패하는 결과로 끝날 수 있다.

